Simple Steps to Enable and Disable Magento 2 Page Builder! Don’t Miss Out!
- October 26, 2023
- Posted by: Vijay Golani
- Categories: Adobe Commerce, Magento 2
Hey there! Welcome to our blog, where I’ll show you how to enable and disable the Page Builder feature in Magento 2. So, if you’re running an online store using Magento 2, you’re in for a treat! This fantastic e-commerce platform gives you a bunch of cool tools to jazz up your store exactly how you want. Now, one of these awesome tools is the Page Builder. What’s so great about it? Well, it lets you make your web pages look super cool and professional, all without needing to know any fancy coding stuff. Cool, right? Let’s dive in and see how you can make your online store visually stunning!
Turning the Page Builder enable or disable can come in handy in various situations. Picture this: you might want to switch it on when you’re feeling super creative and want to craft eye-catching landing pages, product showcases, or catchy banners. It’s like unleashing your inner artist! But hey, there might be times when you prefer to hit pause on it, maybe to tweak some designs using your own special code or just because you fancy using a user-friendly editor. Flexibility is the key!
Get ready because in this blog post, we’ll walk you through the easy steps to turn the Page Builder enable and disable in Magento 2. Whether you’re just starting out or you’re already a pro at using Magento, this guide is here to assist you. It’s your ticket to unlocking the full potential of this awesome feature, allowing you to customise your website exactly the way you want, regardless of your experience level. Let’s make your website uniquely yours!
An Introduction to Page Builder in Magento 2
Page Builder, a robust Adobe extension, seamlessly integrated into Magento 2 from version 2.4.3 onwards, aims to streamline the creation of attractive content for your online store. This tool simplifies the entire process; you can craft compelling web pages effortlessly by dragging and dropping pre-designed elements called “content types”.
Page Builder features a user-friendly interface, providing an intuitive experience where you can effortlessly organize and personalize content elements to match your needs. It offers a range of content types, including text, images, videos, buttons, banners, and more. Accessing these options is a breeze through the Page Builder’s menu, which offers a wide selection of available choices.
One of Page Builder’s standout features is its drag-and-drop functionality. This tool empowers you to effortlessly position and rearrange content elements on your web pages, granting you complete control over the layout and design. What makes it even better is that Page Builder offers live previews as you make changes, allowing you to see exactly how the content will look on your storefront in real-time. With this dynamic preview feature, there’s no need for constant switching between editing and previewing, making your content creation process smooth and hassle-free.
Moreover, Page Builder includes form editors tailored for each content type, offering an easy and convenient method to input and personalize your content.
Page Builder is readily accessible for editing content across different sections of your Magento 2 website. This encompasses product pages, product attributes, category pages, CMS pages, and blocks.
Also Read: https://www.evrig.com/blog/how-to-overcome-magento-2-data-upgrade-errors/
Enabling, Disabling, and Configuring Page Builder in Magento 2
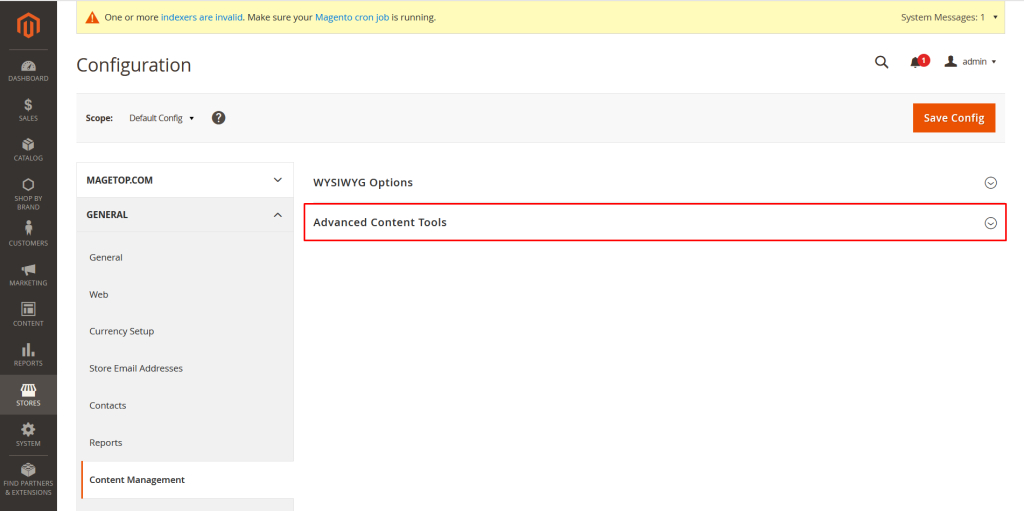
Step 1: Access the Magento 2 admin panel by logging in.
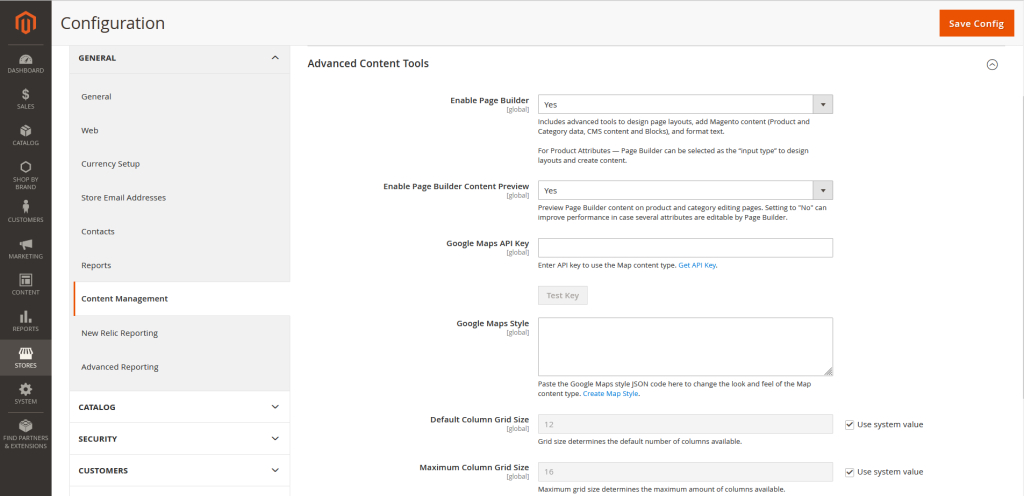
Go to STORES -> Configuration -> GENERAL -> Content Management -> Advanced Content Tools.
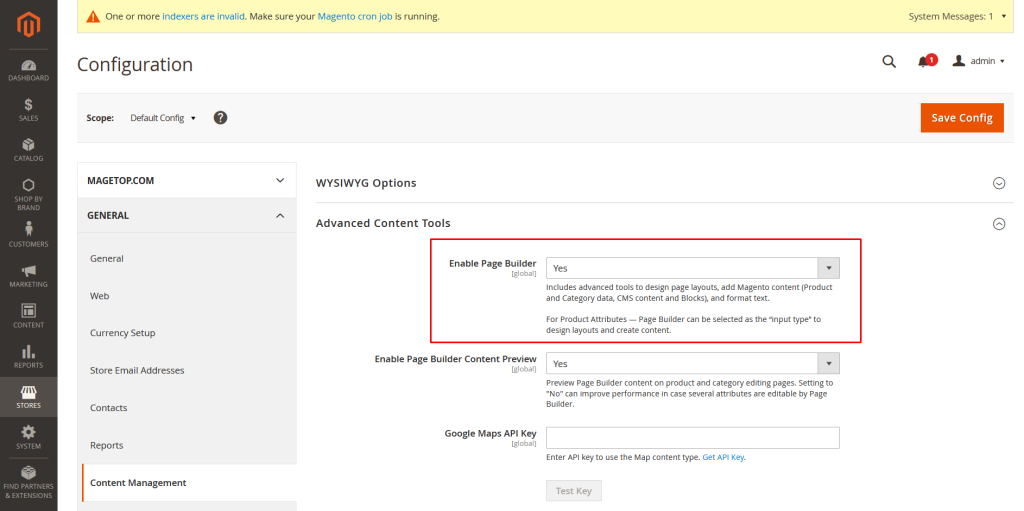
Step 2: Enable or Disable the Page Builder
Enable Page Builder: Choose “Yes” to enable Page Builder, or choose “No” to disable it.
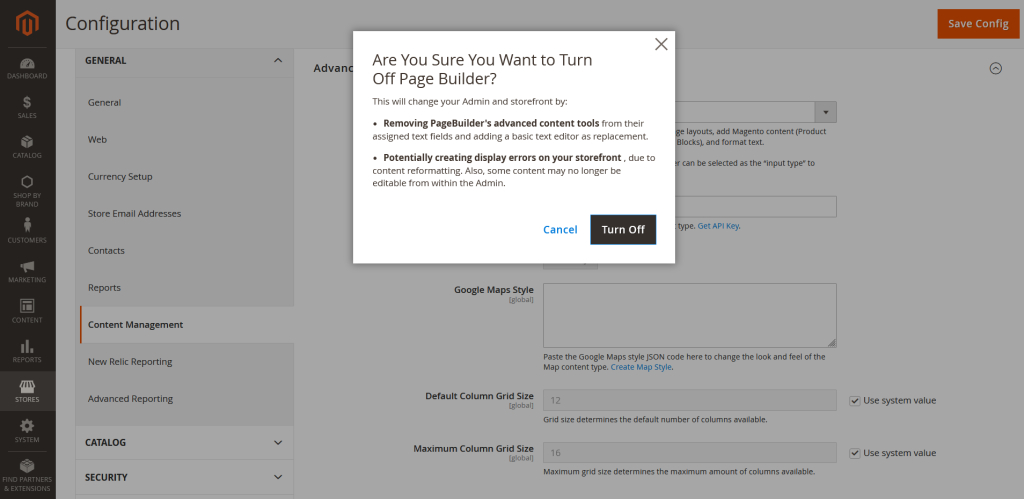
Once Page Builder is turned off, it will be replaced by the default WYSIWYG Editor. However, it’s important to note that disabling it might lead to some complications. Page Builder provides numerous features and versatile customization choices, so deactivating it could mean losing the flexibility and ability to create interactive visual content. Be sure to think it through carefully before deciding to disable Page Builder and ensure your websites continue to function properly after making this change.
Also Read: https://www.evrig.com/blog/enable-or-disable-maintenance-mode-in-magento-2/
Step 3: Adjust other configuration options as required.
- Enable Page Builder Content Preview: Opt for “Yes” to enable content preview on the product and category edit pages. If you encounter performance problems, you can select “No” to Disable the preview.
- Google Maps API Key: To integrate Google Maps into Page Builder, you need a Google Maps API Key. Once you have the API key, you can insert a Google map into a block and place that block on specific pages, such as your About Us page.
- Google Maps Style: If you wish to personalize how the Google Maps content looks, you can achieve this by entering your custom Google Maps style JSON code into the designated field.
- Default and Maximum Column Grid Size: Page Builder employs a grid system based on columns for customizing layouts.
- Default Column Grid Size: This allows you to specify the default number of columns displayed in the grid. Initially, it’s set to 12 columns. To modify this, unselect the “Use system value” option and enter your preferred number.
- Maximum Column Grid Size: This option lets you establish the highest number of columns permissible in the Page Builder grid. Simply unmark the “Use system value” box and input the maximum number of columns you wish to enable.
Conclusion:
Evrig Solutions, your trusted Magento ecommerce development company, simplifies the process of enabling and disabling Magento 2 Page Builder for your online store. Our experts ensure you don’t miss out on this essential feature, enhancing your website’s functionality and user experience. With our proficient team by your side, you can effortlessly harness the power of Magento 2 Page Builder, empowering your online business for greater success. Choose Evrig Solutions for seamless and effective Magento ecommerce solutions tailored to your needs.
1 Comment
Comments are closed.
[…] Also Read: https://www.evrig.com/blog/simple-steps-enable-and-disable-magento-2-page-builder/ […]